
Paint The Wood Truck!
October 19, 2007 by build
Filed under Toys, Woodworking

To add a little flair to the toy truck from the previous posting, we are going to paint it and add a couple of highlight pieces made from a few other scraps lying around the shop.
To paint the truck I used the inexpensive tubes of acrylic paint that can be found at most craft stores.
I painted the body of the truck a crimson red. In order to paint all sides and let them dry at once I left screws in the holes for the front wheels and hung it from my worktable as seen in the photo below.

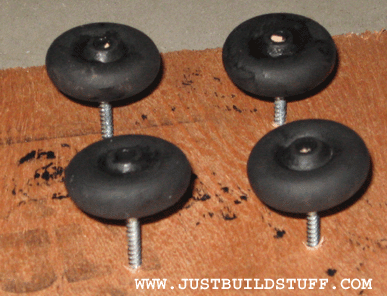
I painted the wheels black and to let them dry I set them on top of four screws that I ran into a scrap piece of plywood.
I decided that to flair the project up a little that I would add a bumper made from piece of scrap wood that was just lying on the floor of my shop. I painted the bumper grey. I also had a ½” dowel that I cut two small pieces from and these pieces are the headlights. I painted the headlights white.

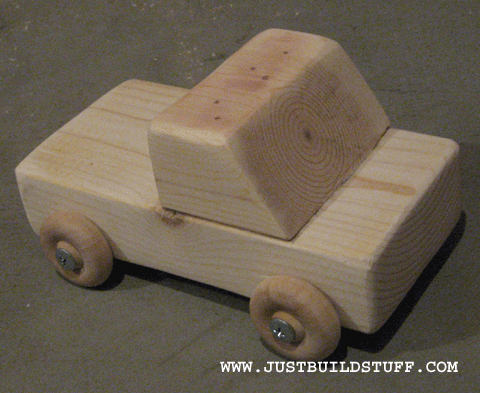
After all of the parts were dry, I assembled them into the final truck. I screwed the wheels back on and used brad nails and glue to attach the bumper and glue to attach the headlights.
It was a fun and inexpensive toy project to build and there are many more customizations and improvements that can be made to the truck to make it even better. Thanks for reading www.justbuildstuff.com.
Build a Toy Truck From Scrap Wood!
October 18, 2007 by Kurtis
Filed under Toys, Woodworking
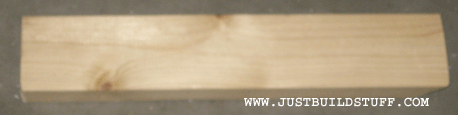
The inspiration for this project was the scrap piece of 2 X 4 shown in the photo below. I wanted to try to think of something fun to use it for and the idea of turning it into a toy truck struck me.
To build this toy truck the first thing I did was to make a 30 degree miter cut at one end of the 2 X 4. Then I made a straight 90 degree cut about 1.5 inches back from that. The last cut I made was to make a 7 inch long block to be used as the base of the truck. The photo below should offer some clarification with the smaller mitered piece (the cab) sitting on top of the base piece.

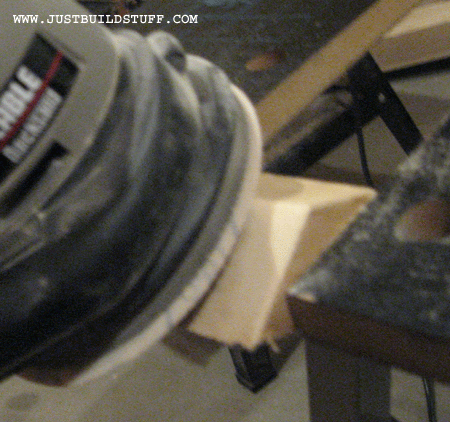
To clean up the pieces and remove the possiblities of slivers I sanded the boards smooth with my random orbit sander and 100 grit sand paper.
After I finished sanding I placed the cab block about 1.25 inches back from the front of the base. I then glued and nailed it down to the base using wood glue and 2 inch brad nails.
Now that the body of the truck is ready, it’s time to add the wheels. The wheels are just 1.5″ wooden wheels that can be found at most craft stores. I attached them using #8 whasher head screws
.

In the next posting we will give the truck a paint job!
Build a Ladder Ball Golf Game- Make the Bolas!
October 17, 2007 by build
Filed under Made From PVC, Toys

***Update- There is now a video version of the ladder golf build click here to view -> https://justbuildstuff.com/?p=448***
In the previous post we built the ladder portion of the game, now it is time to make the bolas. A bola consists of two golf balls, one on each end of a string. Hopefully justbuildstuff.com can provide some tricks to make construction easier.
Here are the supplies that you will need to make a set of three bolas.
- 18 Golf Balls (I used 3 different colors and 6 balls of each color)
- 25 feet of ¼” nylon rope
I also recommend having the following tools
- Drill Press
- ¼” Drill Bit
- 1” Spade Bit
or Forstner Bit
Always remember to use care and precaution when working on any project. Always wear the appropriate personal protection equipment such as safety glasses and gloves. Never operate power tools or equipment you are not familiar with, always read owners manuals and don’t be afraid to sign up for some classes in you community that will teach you how to use power tools and equipment.
The trickiest part of this project is drilling a perfectly centered hole through the golf ball. The best way I have found to do this is by clamping a scrap piece of wood to the table of my drill press and drilling a 1 inch diameter hole in the board using either a 1 inch diameter spade or forstner bit (see photo below). We drill this hole because it is centered with the center of the drill bit.

Now without moving or adjusting the drill press table with the drilled board attached remove the 1 inch diameter drill bit and replace it with a ¼” diameter bit.
Now it’s time to drop the golf ball down into the hole we drilled, notice how it sits perfectly centered with the drill bit. Hold the golf ball with a vise, or channel locks to keep it from spinning. Slowly drill the hole all of the way through the golf ball (see photo). Repeat this with the rest of the golf balls.

The golf balls are drilled, now we thread the ¼” nylon rope through the holes. It helps to have a good clean end of the rope to make the golf balls slide on a little easier. I tied knots in each end of the rope so the outsides of the golf balls were approximately 20 inches apart. After tying the knots I melted the frayed edges of the rope to keep it from fraying further.

Now just repeat this for the other eight bolas and you ladder ball golf set will be complete!!

If you missed them you can check out
Build a Ladder Ball Golf Game- Build The Ladder!
October 16, 2007 by build
Filed under Made From PVC, Toys
***Update- There is now a video version of the ladder golf build click here to view -> https://justbuildstuff.com/?p=448***
Yesterday we introduced the ladder golf ball game and today we are going to go over how to build the ladder structure. The ladder structures are built out of 3/4″ PVC pipe (note that 3/4″ PVC pipe has a 3/4″ inside diameter and approximately a 1 inch outside diameter). To build Two of the ladder structures you need to buy the following items from you local home center.
- 5- 10 foot long sticks of 3/4″ PVC pipe
- 12- 3/4″ PVC “T” fittings
- 12- 3/4″ PVC 90 degree fittings
The next step is to cut the PVC pipe. For each ladder structure you will need the following.
- 9- 2 foot long pieces
- 6- 1 foot long pieces
To build one ladder assembly you should have everything in the photo below. Double the quantities to build two structures.

Now comes the fun part. Put the pipes together into the ladder assembly. You can use the photo below as a guide if you need to. I did not glue my structure together, because I would like to have the ability to disassemble it for storage and it seems more than strong enough without glued joints.

If you are interested in other PVC projects check out our PVC Flagpole project.
Build a Ladder Ball Golf Game!
October 15, 2007 by Kurtis
Filed under build, featured, Made From PVC, Toys
***Update- There is now a video version of the ladder golf build click here to view -> https://justbuildstuff.com/?p=448***
Here is another project for our series of how to build toys. This one is a game, one that has recently become popular under many names. I think the most commonly accepted name is ladder ball, but I have seen it referred to as Norwegian Golf, bolo ball, bola ball, hillbilly horseshoes and many others. The game consists of throwing bolas (golf balls on a rope) at a ladder structure; see the Wikipedia page for more information about ladder ball. This is another project that is built almost entirely from pvc pipe, which I find to be incredibly easy to work with and inexpensive to purchase. The project is split into two parts; in the first part, we will build the ladder structure and in the second part, we will make the balls, or bola that are thrown at the ladder structure.
How to build the ladder structure can be found here!
