
The Milk Jug is the Ghost!
Light the way for trick-or-treaters this Halloween with spooky ghost lanterns! I love to create crafts, especially ones I can work on with my daughter. Thankfully, I have a subscription to Family Fun magazine that is loaded with creative and inexpensive ideas. This idea came from the October 2007 edition. I started preparing to make this project a couple weeks in advance as it calls for several plastic gallon milk jugs. After we finished drinking the milk I thorougly rinsed the jugs so we wouldn’t greet our trick-or-treaters with a sour milk smell. Once I had collected several jugs we took a black marker and drew ghost faces onto the jugs. We had a blast trying to make each face unique! *Remember to wear art clothes just in case you get some marker on yourself.

Next we plugged in a string of holiday lights and dropped a bulb down each jug. (In Family Fun, they recommend cutting a half-dollar size hole in the back of each jug so you don’t see the string.)

Not only are these ghosts fun to make, but they are also inexpensive. Furthermore, I think they will help trick-or-treaters stay safe as they will be walking on a well-lit path. Plus it helps put everyone in the holiday spirit!
Steps to Produce a Project
Below are the steps that I follow when I am planning to build something.
- Start with an idea of what you want.
- Study similar things, Look at existing product designs, other types of furniture, or anything that exists in nature for inspiration
- Make a quick sketch of the idea
- Ask for input
- Refine the Sketch
- Add Dimensions
- Choose Materials
- Start building and having fun
- Finish and enjoy
During our future projects I hope to lay out some examples of early planning stages.
Fun With ABC Bath Toys!- A Foam Alphabet
My daughter loves to take baths. There are times when she is so crabby it seems nothing will make her happy, but when I put her in the tub she is singing like a lark in no time. Perhaps this is because she loves her bath toys so much. One of her favorite bath toys is something I created in an afternoon – a foam alphabet.
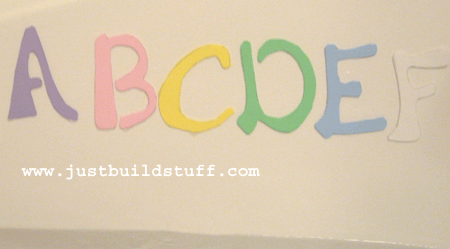
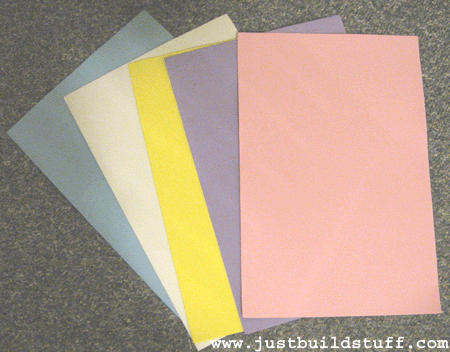
To make this project I used several different colored sheets of foam (shown below) that can be purchased from amazon.com or your local craft store, a scissors, a pencil and some stencils. Not everyone will need the stencils – I used them because my handwriting is terrible. My daughter loves to get the foam wet and stick it on the tub walls. She has even used her foam letters to make “alphabet soup”. I love this toy because it gives her a great learning opportunity.
I plan to make more foam toys for the tub such as foam numbers, shapes, animals and maybe even some “paper” dolls. Let your imagination decide what kind of bath toys you want to make!
Make Some Homemade Play Dough!
What is more fun that play dough? You get to build pretty much anything you want with play dough and if you don’t feel like building something you can just squish it, smoosh it and roll it into balls and hot dog shapes for stress relief. Everybody knows that you can go down to down to your local retail store or amazon.com to buy some play dough, but not everyone knows that you can make your own! My sister-in-law is a kindergarten teacher and she makes it all the time for her classroom.
As part of our build simple toys initiative justbuildstuff.com is going to share her recipe with our community. And make a batch ourselves for play and testing purposes. We start with a materials shopping list, note that this recipe requires a lot of salt. I did not notice until I started adding ingredients that I did not have enough salt and I had to empty every salt shaker I had in order to complete the recipe.
- Flour- 3 cups
- Cream of tartar- 1TB.
- Salt- 1 1/2 cups
- Vegetable Oil- 2TB.
- Water- 3 cups
- Food coloring- As Needed
To begin I dumped all of the ingredients into a saucepan. As you can see in the photos below I should have selected a larger saucepan, but the one I used worked.

After adding all of the ingredients, I set the stove top to medium heat and began stirring the concoction. I added yellow and red food coloring to make orange play dough. I don’t know if I stirred more than I needed to, but I really got a work out stirring this stuff. After about five minutes or so of stirring, the dough mixture
began to get very thick and pull to the center as shown in the photo below. At this point I removed the saucepan from the burner for it to cool.

When the dough was cool enough to touch, I squished around some clumps of it and laid it out on wax paper for additional cooling.

After the dough was completely cool, I squished and kneaded it again and bagged it into freezer bags.

Then after waiting about an hour my family and I played with some freshly made play dough. The only real notable difference with the
home made play dough is that you will get a salty residue on your hands while playing, but the home made play dough seems to
last longer than the commercial version before it dries out!
Toys- Build Something Fun!
Toys, toys, toys! Before the holiday season, justbuildstuff.com will be posting a series of simple to build toy ideas that anyone can build for the children in their lives. Oftentimes the most meaningful gifts are ones that the giver puts some thought into and creates especially for the recipient. These projects will be simple and fun things like play dough and toy trucks. Best of all you get to have the enjoyment of building the toy and every time you see it you can proudly say, “I built that! “
If you have any simple toy ideas you would like to see posted on the site, send us an email at build07@justbuildstuff.com or leave a comment on this post. Keep building and keep checking out www.justbuildstuff.com for more building ideas.
