How to Make Beeswax Wood Finish
January 31, 2015 by Kurtis
Filed under build, featured, Refinish/Remodel, Woodworking
In this video I show how I make a beeswax paste finish for my woodworking projects using beeswax and olive oil.
The ingredients I use are-
1 Cup of extra virgin olive oil
1 oz stick of beeswax (link to Amazon)
1 microwave safe container, (I use a jar that used to have Wylers Chicken Bullion Cubes) (link to Amazon)
New Drawer Pulls for a New Look
January 10, 2008 by build
Filed under Refinish/Remodel
My wife and I found some fun drawer pulls on sale while out shopping and we decided to use them to spruce up the look of an old dresser in one of our guest rooms. It was an inexpensive way to make it feel new and fun again. The only bad thing is that this has now inspired us to add a coat of paint the the dresser.
A Little Paint and a New Look
December 13, 2007 by Kurtis
Filed under Refinish/Remodel
We all get the itch to change the look of our homes and to accomplish this we usually go out to buy something new, but you don’t have to. Sometimes a little paint is all you need to make a big difference. To get a new look for our wall, we took an existing metal wall hanging and applied a little bit of inexpensive spray paint. Now it fits in perfectly with the rest of the room’s decor.
Recover a Stool With Fun, New Fabric
My sister-in-law is the queen of finding deals, and this justbuildstuff.com project is a result of her finding an incredible deal on a footstool at a rummage sale. The footstool was in great shape and she wanted to add a little flare to it by recovering it with fabric she had found that displayed a Coca-Cola theme (her favorite beverage).
Disassemble
To begin the recovering project, we first flipped the stool over to remove the screws that were holding the seat top to the base (photo below).
Cut the Fabric
Next, we used the cover to size the fabric piece that we needed to cut (see photo below). The fabric needs overlap each side by at least an inch or two so that there is room to staple the fabric to the seat top. For this project we left the existing fabric on the seat cover because it was in good condition and would provide a good base for the new fabric. Some recovering projects may require removing the old cover and replacing the pad and batting.
Now that the fabric is sized it is time to cut it out. To get nice straight lines, the fabric was folded to make a visible crease. The crease line was cut with a scissors as shown in the photo below.
Attach the Fabric
Making sure the design side of the fabric was facing down, we placed the seat cover onto the middle of the fabric. We then pulled the fabric tightly up over the side and put a staple in the middle, as shown in the picture below.
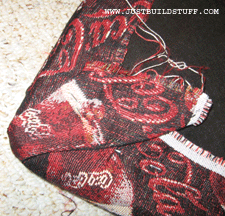
The trickiest part of getting the cover fabric to look good is in the corner as seen in the photo below. You need to make sure to fold the fabric and staple each corner in the same manner. After a corner is stapled, flip the seat over to ensure that the corners look the same as the ones you previously stapled.
Put the Stool Together
Now that all for corners are stapled and the cover is looking extraspecially wonderful with the new fabric, it’s time to reattach the cover to the legs of the stool in much the same way as they were removed. Try to find the original holes and use the original screws if possible.
After the legs are reattached the stool is finished except for cleaning up the frayed edges on the bottom side with a scissors.


