
PVC Flagpole- The New Version
May 26, 2015 by Kurtis
Filed under build, Made From PVC
A few years ago I did a post on how to build a small, slanted flagpole like those seen in many RV parks, you can find links to that four part series here.
Old version- Part 1, Part 2, Part 3, and Part 4
Now, I have done a video and some slight changes/improvements to the design. The biggest changes are using 1″ instead of 3/4″ PVC pipe and adding a solar spotlight to the back of the flagpole to keep the flag lit at night. Thanks to Chris Spencer for the idea of adding a solar light to the flag pole.

Tools
- PVC Cutter
- Drill with 1/4″ Brad point Bit
- Tape Measure
Super Glue

Parts
- 10 foot long piece of PVC pipe
- 2- Tee fittings
- 2 45 degree fittings
- 1 End cap
- Solar Spot Light
- Stake (piece of rebar or other)
- Hooks (clips, ties, shower curtain rings, ect.)
- Short piece of 1/2″ PVC pipe (about 6″ to 1 foot long)


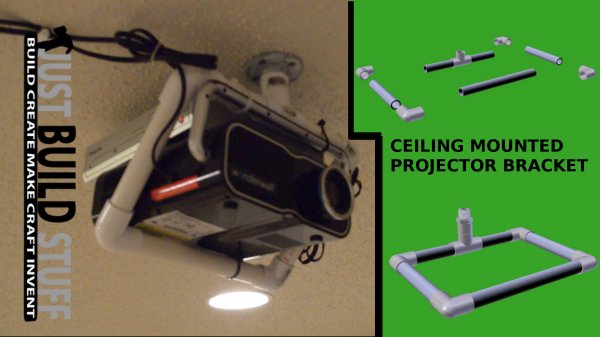
DIY Ceiling Mounted Projector Bracket Made from PVC
February 23, 2015 by Kurtis
Filed under build, featured, Made From PVC, Maker DIY
This is a video of how I made a simple ceiling mounted projector bracket out of PVC pipe.
I purchased an inexpensive Sharper Image Wonderwall projector on ebay and I wanted an easy and inexpensive way to mount it. I rounded up the pvc parts I had in my garage and came up with this projector bracket. The Wonderwall projector is very light, if you have a heavy projector I would not recomend trying something like this.
Link to watch video on youtube.
An excel file with links to buy the parts at Menards is attached below.


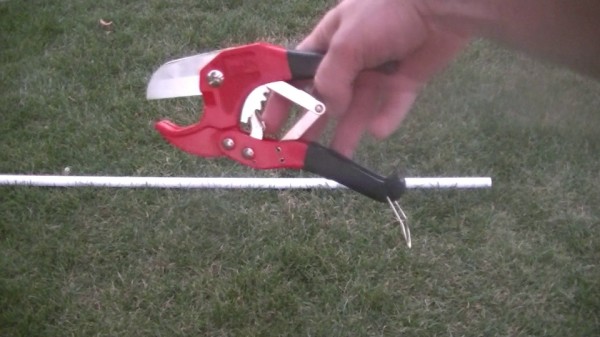
Use a PVC pipe cutter to cut PVC pipe to correct lengths.
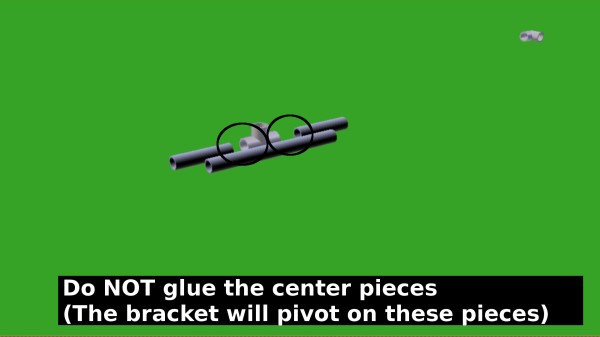
Slide the 2 4.25″ pieces into the tee fitting. Do not glue them, this is where the bracket pivots.
Glue the 4 elbow fittings to the pipes. In this situation I used super glue to glue all the joints as I do not care if the joints leak, I only care they are bonded well.


Screw the projector bracket into the ceiling. Take care to find a stud or ceiling beam, drywall and most ceiling panels will not support the weight of a projector. Also make sure you are not screwing into wires, pipes, ducts or anything else in the ceiling.

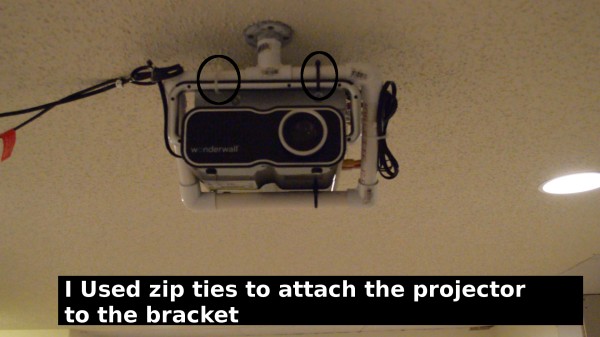
I used cable ties to attch the projector to my pvc bracket.
Video of How to Build a Ladder Golf Game
September 1, 2014 by Kurtis
Filed under build, Games, Made From PVC, Toys and Games
This is an update to the ladder golf how to instructions I published previously.
Build a Ladder Ball Golf Game- Make the Bolas!
October 17, 2007 by build
Filed under Made From PVC, Toys

***Update- There is now a video version of the ladder golf build click here to view -> https://justbuildstuff.com/?p=448***
In the previous post we built the ladder portion of the game, now it is time to make the bolas. A bola consists of two golf balls, one on each end of a string. Hopefully justbuildstuff.com can provide some tricks to make construction easier.
Here are the supplies that you will need to make a set of three bolas.
- 18 Golf Balls (I used 3 different colors and 6 balls of each color)
- 25 feet of ¼” nylon rope
I also recommend having the following tools
- Drill Press
- ¼” Drill Bit
- 1” Spade Bit
or Forstner Bit
Always remember to use care and precaution when working on any project. Always wear the appropriate personal protection equipment such as safety glasses and gloves. Never operate power tools or equipment you are not familiar with, always read owners manuals and don’t be afraid to sign up for some classes in you community that will teach you how to use power tools and equipment.
The trickiest part of this project is drilling a perfectly centered hole through the golf ball. The best way I have found to do this is by clamping a scrap piece of wood to the table of my drill press and drilling a 1 inch diameter hole in the board using either a 1 inch diameter spade or forstner bit (see photo below). We drill this hole because it is centered with the center of the drill bit.

Now without moving or adjusting the drill press table with the drilled board attached remove the 1 inch diameter drill bit and replace it with a ¼” diameter bit.
Now it’s time to drop the golf ball down into the hole we drilled, notice how it sits perfectly centered with the drill bit. Hold the golf ball with a vise, or channel locks to keep it from spinning. Slowly drill the hole all of the way through the golf ball (see photo). Repeat this with the rest of the golf balls.

The golf balls are drilled, now we thread the ¼” nylon rope through the holes. It helps to have a good clean end of the rope to make the golf balls slide on a little easier. I tied knots in each end of the rope so the outsides of the golf balls were approximately 20 inches apart. After tying the knots I melted the frayed edges of the rope to keep it from fraying further.

Now just repeat this for the other eight bolas and you ladder ball golf set will be complete!!

If you missed them you can check out
Build a Ladder Ball Golf Game- Build The Ladder!
October 16, 2007 by build
Filed under Made From PVC, Toys
***Update- There is now a video version of the ladder golf build click here to view -> https://justbuildstuff.com/?p=448***
Yesterday we introduced the ladder golf ball game and today we are going to go over how to build the ladder structure. The ladder structures are built out of 3/4″ PVC pipe (note that 3/4″ PVC pipe has a 3/4″ inside diameter and approximately a 1 inch outside diameter). To build Two of the ladder structures you need to buy the following items from you local home center.
- 5- 10 foot long sticks of 3/4″ PVC pipe
- 12- 3/4″ PVC “T” fittings
- 12- 3/4″ PVC 90 degree fittings
The next step is to cut the PVC pipe. For each ladder structure you will need the following.
- 9- 2 foot long pieces
- 6- 1 foot long pieces
To build one ladder assembly you should have everything in the photo below. Double the quantities to build two structures.

Now comes the fun part. Put the pipes together into the ladder assembly. You can use the photo below as a guide if you need to. I did not glue my structure together, because I would like to have the ability to disassemble it for storage and it seems more than strong enough without glued joints.

If you are interested in other PVC projects check out our PVC Flagpole project.
