The PVC Flag Pole Project- Part One
October 5, 2007 by build
Filed under build, Made From PVC

This www.justbuildstuff.com project involves building a flag pole out of inexpensive PVC pipe. Flag poles like these are often seen around RVs at campgrounds across the country. In fact, I first saw one on a family camping trip to South Dakota. They are a neat way to display a flag, whether it be in patriotic sense, to show support for your favorite sports team, or simply for decorative purposes. This flag pole offers a unique manner of displaying the flag with its interesting angle and ability to move when it catches the wind. This project is quite fun to work on while at the same time being extremely simple.
Check back during the next few days to see how the flagpole is built.
Click Here to go to part two of building the flag pole.
When You’ve Got Scraps, Make Blocks!
Building should not require a lot of money. In fact, I try to do my justbuildstuff.com projects without spending any money if possible. I think this is better for both the environment and for my wallet.
A fun example is to save all the little scraps of wood you find when cleaning up your shop floor after a project and use them as building blocks for children. You probably want to sand the pieces to eliminate the possibility of slivers and get rid of the sharp corners. For a little extra pizazz you can also paint and finish the blocks to make them look a little spiffier. They end up being a unique and fun toy that can help to build creativity skills and the all important building skills.
Recover a Stool With Fun, New Fabric

My sister-in-law is the queen of finding deals, and this justbuildstuff.com project is a result of her finding an incredible deal on a footstool at a rummage sale. The footstool was in great shape and she wanted to add a little flare to it by recovering it with fabric she had found that displayed a Coca-Cola theme (her favorite beverage).
Disassemble
To begin the recovering project, we first flipped the stool over to remove the screws that were holding the seat top to the base (photo below).

Cut the Fabric
Next, we used the cover to size the fabric piece that we needed to cut (see photo below). The fabric needs overlap each side by at least an inch or two so that there is room to staple the fabric to the seat top. For this project we left the existing fabric on the seat cover because it was in good condition and would provide a good base for the new fabric. Some recovering projects may require removing the old cover and replacing the pad and batting.
.
Now that the fabric is sized it is time to cut it out. To get nice straight lines, the fabric was folded to make a visible crease. The crease line was cut with a scissors as shown in the photo below.
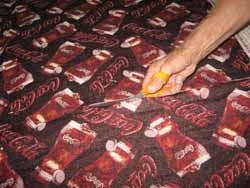
Attach the Fabric
Making sure the design side of the fabric was facing down, we placed the seat cover onto the middle of the fabric. We then pulled the fabric tightly up over the side and put a staple in the middle, as shown in the picture below.
The trickiest part of getting the cover fabric to look good is in the corner as seen in the photo below. You need to make sure to fold the fabric and staple each corner in the same manner. After a corner is stapled, flip the seat over to ensure that the corners look the same as the ones you previously stapled.
Put the Stool Together
Now that all for corners are stapled and the cover is looking extraspecially wonderful with the new fabric, it’s time to reattach the cover to the legs of the stool in much the same way as they were removed. Try to find the original holes and use the original screws if possible.
After the legs are reattached the stool is finished except for cleaning up the frayed edges on the bottom side with a scissors.
.